When I first started Project Life I was most curious
about everyone else's routine and process. The more simple, minimal, and beautiful
the layouts, the more effortless it seemed, and I wanted to better
understand what they did so I could see how I
might adopt some of their strategies.
I am so far from where I'd like all my layouts to look, and I'm trying
to train my eye to create more cohesive designs by poring over others
that I admire and perusing books that teach basic design principles and
color theory.
That said, I've documented my current process and
routine below in hopes that I may look back and be able to see how my
process evolves over time.
Project
Life is a slow process for me. I want to put that out there right off
the bat, because I didn't realize this is true for a lot of other
people. If I had known this earlier on, I wouldn't have spent so much
time wondering what I was doing wrong.
[ During the week ]
Every week, as I collect papers, business cards, and bits and pieces of
life, I stick them directly into a page protector to remember to
include them in the spreads; I jot down notes, conversations, and other
details on a Post-It and stick those in the pockets too, so I can decide
later how to put it all together.
Photographs
make up most if not all of my Project Life content, so I don't really
think about the layout or have any vision of how the spread will look
until I have all my favorite pictures printed out at the end of the
week.
[ Photos ]
Throughout the
week, I take pictures of anything and everything and edit on the go. The
majority of the photos I use in Project Life are from my phone, so
editing is also done almost exclusively on the phone, using a
combination of my phone's stock Android image editor and Snapseed.
I'm not an expert photographer, but here is a quick rundown of the editing that I do for most photos off my phone:
Right: Usually the image right out of the phone is a bit too dark and a bit flat.
Left: I use
the curves to brighten the mid-tones. Cambridge in Colour has a really in-depth article describing how to use Photoshop curves, which can be translated almost directly to the curves function in the stock Android image editor.
Right: This photo was taken in the shade, which usually casts a blue tint on photos. I want to adjust the white balance,
but this image editor doesn't do this very well, so again I used the
blue curve to decrease the blue mid-tones to make the picture look
warmer, as if we
were sitting in the sun.
Left: Because we were sitting under trees, the green leaves cast a green tint on the photo, so I've brought down the green in the
photo as well. Your subjects will usually reflect the color of any large object nearby, so that's what to watch out for.
Above: This last part is completed in Snapseed, which has a few more "fun"
options, like Tilt-Shift, which allowed me to focus on the subject and
gently blur the rest of the photo out. I do this only for a handful of my photos, and only if it simulates depth of field
semi-realistically, but it does help focus on the subject, especially
when there are so many photos on one page in Project Life.
By the end of the week, I have pretty much edited all my favorite photos and decided which ones I'll print.
[ Printing ]
My
least favorite part of Project Life or anything photography-related is
transferring photos to my computer, whether via SD cards, USB wires,
etc. It's not even rational; I just hate the extra step.
Google+ to the rescue! All
photos taken on my phone, as well as the ones that were edited with the
Android image editor, are uploaded to Google+ automatically! There, I
can browse all the photos I've ever taken, download the ones I like, and even add them to my Blogger album for inclusion in future blog posts. Voilà.
(Click through to the Google+ Help Center to see how you can set this up for both Android and iOS.)
Once I've downloaded my favorites, on Sundays or Mondays, I use Photoshop to drop them into
these 4x6 photo templates from Liz of PaisleePress,
available in her shop as a free download. Sometimes I'll add a bit of
journalling to the photo at this point, but I've found that this limits my
options later when I pulling the layout together, so I don't do that
anymore unless I know exactly what the layout is going to look like.
I
send my photos to the nearest Target.com for printing; at $0.19 per two 2"x3" photos, I consider it a steal.
[ Putting it all together ]
While
each photograph has to stand
on its own, I also try to make the layout tell a story and/or provide
context for the memory. The original Project Life 12"x12" format was a
bit too big and unwieldy for me, and I had trouble making it all
cohesive.
Even in the 6"x8" format with slots for only eight 3"x4" photos, putting it all together is really, really hard.
I try out almost every possible permutation of photos and memorabilia
in the 8 slots: I slide everything into the pockets, remove them, move
them around, repeat 4x, and then often re-do pages after a couple weeks.
It's a cycle of agony, but I love when it all comes together.
It's
taken a bit over a year, but after a lot of trial and error, I've
started to figure out what works best for me. Here are my top 3:

1. Keep constraints consistent.
Even though these page protectors come in
different "pocket" sizes, I stick to those with four 3"x4" pockets so I
know exactly what size I need to work with.
Right, above: If I take a photo in landscape mode (horizontally), I
know to keep the subject either to the left or the right, so I can cut
down the middle to fit into the 3x4 slots (see the left page below).
Left, above:
Since most photos are taken with my phone, I naturally take photos in
the portrait mode (vertically), which works well with the 3"x4" slots
(see above right page).
This "constraint" also means that when I flip the page for the next spread, I won't
be constrained by whatever size I had used the previous week; i.e., if I use a 4"x6" photo pocket, when I
turn the page I would be forced to work with that 4"x6" pocket in the next spread. I much
rather know exactly what size the pockets are going to be.
Obviously, lots of people
prefer the flexibility and creativity of different pocket sizes -- the official Becky Higgins product line
has more than 10 different page protector designs -- but I found it to be
overwhelming for me. The most important thing is to do what works for
you.
2. Keep the tone and "feel" consistent.
With the 6"x8" format, there is only so much real estate, so I
try to keep saturation and color tone similar, so the eye can move from
one photo to another without major distractions. This is easier said
than done, especially because it means I have to cull my collection of
photos from the week, and in that process, discard the ones that don't
work.
One method I use is to pick out colors from one photo, and use papers similar in tone and saturation to round out the spread.
Above:
I picked out the
pinks and greens from the cupcake photo to ground the layout, and then
rounded it out
with a neutral chevron print to the left. There were two other photos
that I knew would clash in color (i.e., the photo with the pug had a
bright green grass in it) so I changed them to black-and-white and
decreased the black/white contrast to keep the tone and contrast
consistent with the rest of the layout.
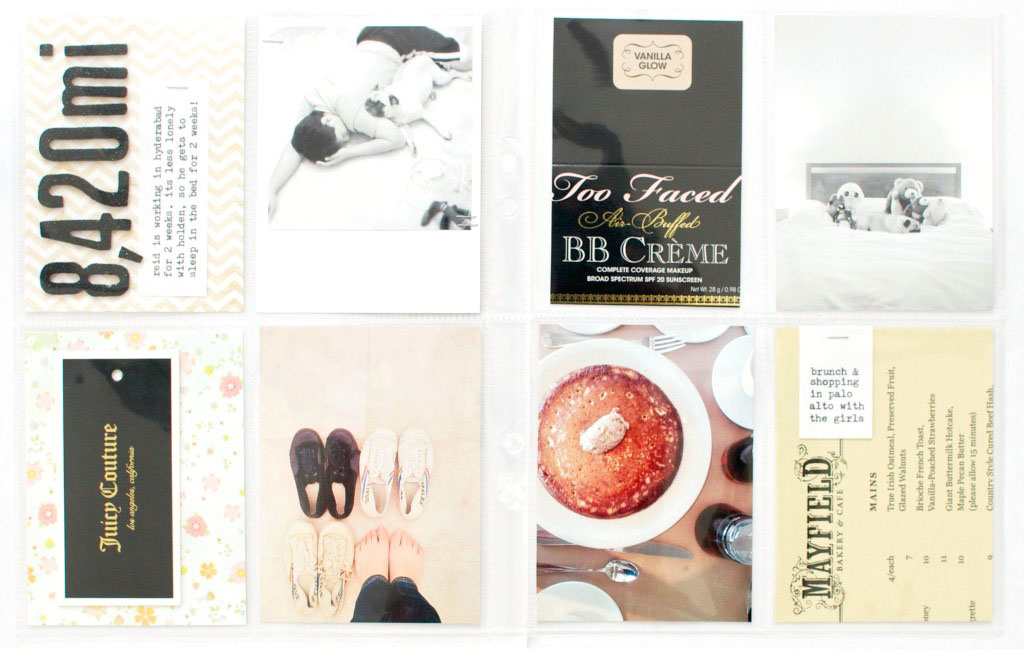
Some layouts look a little too neutral and consistent so I'll use accent colors.
 Above: This
one was easier, because all the pictures were take indoors with
approximately the same lighting. However, that also made it look really
boring and flat, so I added mint-colored papers to call attention to the
journaling. I chose those particular greens because they were similar
in saturation and tone to the rest of the photos.
Above: This
one was easier, because all the pictures were take indoors with
approximately the same lighting. However, that also made it look really
boring and flat, so I added mint-colored papers to call attention to the
journaling. I chose those particular greens because they were similar
in saturation and tone to the rest of the photos.
Those two
things above are very simple in theory and I feel silly to have
even documented them here, but it took me more than a year to figure out
a system that worked for me, and helped me figure out why I liked some
spreads a lot more than others.
And lastly for now:
3. Be date-flexible. Many
people create one spread per week and document the year from Week 1
through 54, but this doesn't work for me. I learned this one from the
amazing JamaicaMakes, whose post here about her process really resonated with me.
I loosely keep
track of months and use as many pages as I need without regard for when a
week begins or ends. Some spreads will cover a whole week, some will
cover one day. I don't organize the photos in the order they were
taken (though admittedly, it sometimes bothers me).
When I flip through Project Life, all I want to know is that good times were had, and a
picture with a bit of journaling will bring me back to those moments. Do whatever you need to do to get you there :)


 Above: This
one was easier, because all the pictures were take indoors with
approximately the same lighting. However, that also made it look really
boring and flat, so I added mint-colored papers to call attention to the
journaling. I chose those particular greens because they were similar
in saturation and tone to the rest of the photos.
Above: This
one was easier, because all the pictures were take indoors with
approximately the same lighting. However, that also made it look really
boring and flat, so I added mint-colored papers to call attention to the
journaling. I chose those particular greens because they were similar
in saturation and tone to the rest of the photos.

